
CREATING A BETTER PROFESSIONAL WORKFLOW: PART 1 — FANTASTICAL
Posted on Jul 25, 2018 Leave a Comment
 My inbox, and by extension my mind, is a torrent of tasks, requests, and reminders. The fog of busy is blinding. Occasionally a moment of clarity emerges, and I am able to write categories of tasks and to-do lists on what seems to be an endless stream of sticky notes. Some of those tasks get completed, some get pushed off, and others get doomed to oblivion as a detached and crumpled note at the bottom of my bag. Unfortunately, the awkward “I must have missed your email” or “sorry, I completely forgot” conversation has happened more than once. I need a better way to manage emails, dates, tasks, and reminders.
I am taking a journey into better productivity through the following six cross-platform applications: Airmail, Fantastical, Evernote, OmniFocus, Workflow, and IFTTT. Over the next several months, I will be purchasing, learning, integrating, and streamlining my workflow and will be documenting this journey.
There may be other applications that emerge as crucial components, but after a little research, these six applications will serve as essential productivity and workflow boosters.
So to start off, I am tackling my calendar system.
Like many, I either have little written in my Apple Calendar app and have work-related calendars through Google Calendar. The “let me check my calendar” statement doesn’t really work for me because even though I am busy, I have nothing written in my calendar. That needs to end.
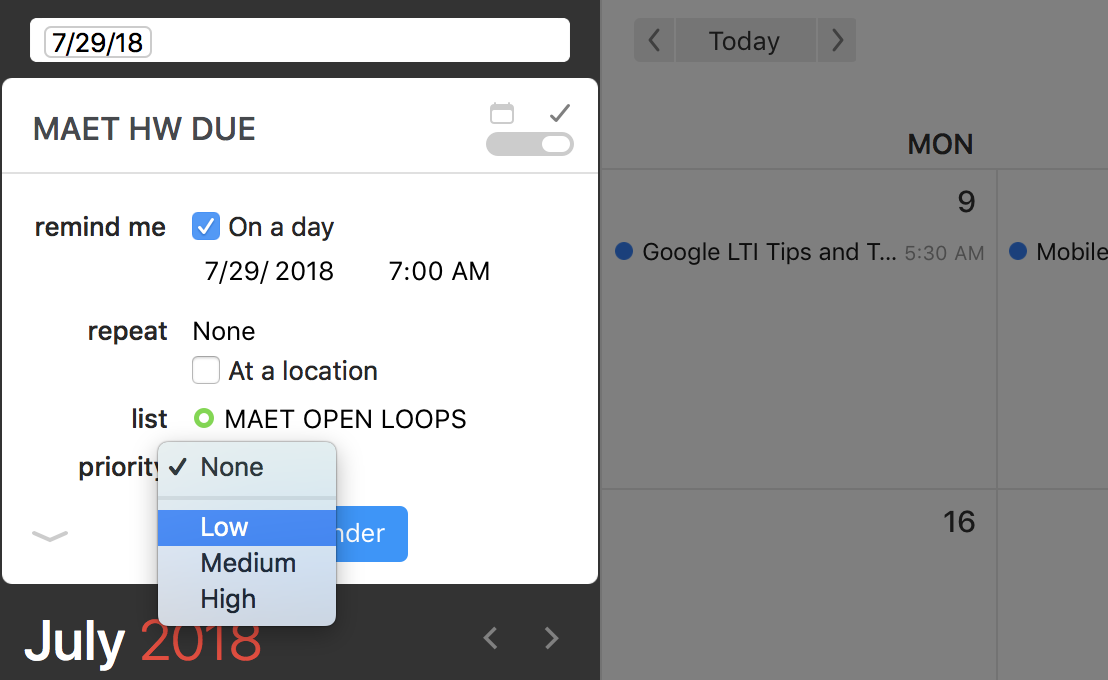 Fantastical is an interconnected system that syncs with other applications like Apple, Google, and Microsoft calendars. The app not only reads the events and displays them together in one intuitive platform, but backward publishes new events from Fantastical to designated calendars. Adding an event is simple and intuitive in the Mac OS software. The software also provides the option of creating tasks directly in the Calendar that can be checked off. Unfortunately, these events are synced to other calendars, but not automatically to a task manager. This will take another step to be addressed through IFTTT, which I will explore in future postings.
Adding calendar events is simple and intuitive in the iPhone iOS, with an intelligent population of event data, times, and GPS from a simple typed line of text.
While numerous other features make this software powerful, Fantastical has an incredibly smart and easy way to capture events and data. And at the end of the day, power and ease are most important. When quickly planning an event or marking a task to be completed, it needs to be comfortable and quick. I don’t need to worry about populating sections of data. I want a smart application that knows how to fill in the useful information for me.
A major caveat of this powerful tool is the financial investment. The cost is steep, and if your workflow requires cross-platform applications, it is even more costly. The iPhone iOS application is 4.99, the iPad iOS application is 9.99, and the Mac OS application is a staggering 49.99. The latter has a 21-day free trial that might be worth checking out. The good news is that Flexibits, the software company who created Fantastical, offers a 20% discount for those in Education or Military service.
Whatever the case may be, the capturing of these dates, tasks, and reminders is well worth a 65 dollar investment, especially for ease of use and workflow.
A snapshot of Fantastical MacOS populated with several events and tasks from multiple calendar platforms.
*All images are screenshots of software or were created and/or edited by Jonathan Keck from personally owned stock images.
CREATING CREATORS: PERSONALIZED LEARNING AND TECHNOLOGY
Posted on Jul 24, 2018 Leave a Comment
 Personalized learning and technology create creators. A personalized approach to learning dictates less and provides space for the authentic voices and choices of students. Moreover, this approach naturally lends itself to making. Richard Culatta argues that technology affords this possibility in the education system. If used correctly, technology can create a learning environment where students can learn and create in ways that were otherwise impossible in a generation before (TED, 2013). The education system needs to adapt to this change lest they become irrelevant, or worse, an impediment, to real and useful education. The answer is not the mere presence of technology, but the proper use of this technology as an empowering tool in a new pedagogical paradigm.
Personalized learning is the future. One may shrug this pedagogical buzzword off as the latest fad destined to fade in a few years. The revolution of interconnected technology seems to suggest otherwise. There are many aspects of personalized learning. As a general principle, personalized learning is a reorientation of education toward individuals and not toward whole blocks of carbon-copy students. Instead of instructing students according to a predesigned plan, teachers create with their students a pathway of education that addresses their needs and interests. The implications of this approach have a transformative impact on all aspects of the educational structure. While there are numerous challenges personalized learning brings to the status quo, two significant factors are pacing and assessment.
Concerning the former, Basham, Hall, Carter, and Stahl (2016) explore learning and pacing in a personalized learning context. Through studying K-12 schools practicing different blended and personalized learning approaches, they concluded that the potential transformation of learning could result in tremendous improvements. Among twelve schools studied, 25% of students had achieved one full year of growth in math and reading by the middle of the school year (Basham, Hall, Carter, and Stahl, 2016, p. 130). Assessments, activities, and pacing were transformed to address the individual needs of students. Indeed, Culatta argues that a fixed pace and schedule of learning hampers student progress (TED, 2013). Personalized learning ought to allow for variability and individualized pacing. The challenge, however, is creating a class and school culture that can allow for such an educational environment. This shift transforms how a class looks and runs. Technology makes personalized learning much more efficient, and fostering a making culture in the classroom does so even more.
Personalized learning, variable pacing, and a classroom making culture require a shift in how teachers see assessments. Thomas Wanner and Edward Palmer (2015) explore personalized learning and its roll in blended and flipped classrooms. In particular, they focus on “flexible learning” through assessments. While studying flipped university classrooms, Wanner and Palmer concluded that students preferred “flexible assessments.” While assessments are often standardized and used as measurements of learning, these “flexible assessments” reflect a different purpose. In light of personalized learning, assessments function more as tools for learning and function best if they are customized, along with students, to measure student creation and choice (Wanner and Palmer, 2015, p. 357). Indeed, according to Culatta, one of the most significant challenges in the classroom today is that the educational system tends to treat all students the same (TED, 2013). Each student has different needs, learning gaps, and interests. To effectively reach each of these learners, a new approach to assessment is needed. Through a personalized learning approach, each student’s education is unique. In light of that, an assessment of that learning ought to be equally unique. Indeed, if students are encouraged to create and make according to their own needs and interests as they process the course’s content and themes, assessment becomes more a function of operability and skill, rather than rote memorization.
Technology is just a tool for learning. A real transformation would disrupt much, from streamlined grade books to uniform lesson plans for administrative oversight. Are teachers supposed to write twenty-five formal plans? What function do course periods have in this new reimagined learning system? If a student completes all work related to the course, do they move ahead to the next in the middle of the year? What resources are there for creating a making culture? If assessments shift to skill and creation, what form do finals take? Many other questions can and should be pondered. Personalized learning is disruptive, but perhaps it is the disruption needed to call into question the trite and tired response “We have always done it this way.”
References
Basham, J. D., Hall, T. E., Carter, R. A. , & Stahl, W. M. (2016). An operationalized understanding of personalized learning. Journal of Special Education Technology, 31 (3), 126-136.
TEDx. (2013, Jan 10). Richard Culatta: Reimagining learning [Video file]. Retrieved from https://www.youtube.com/watch?time_continue=8&v=Z0uAuonMXrg
Wanner, T., & Palmer, E. (2015). Personalising learning: exploring student and teacher perceptions about flexible learning and assessment in a flipped university course. Computers and Education 88, 354-369.
___________________________________________________________________
*Image credit: original picture purchased through Shutter Stock. Edited and redesigned by Jonathan Keck.
Ed Tech Can be a Firehose! This will help.
Posted on Jul 20, 2018 Leave a Comment

Just a year ago the President of the Catholic High School at which I work suggested that another colleague and I attend CUE Conference in Palm Springs. He was an old school advocate for technology, working with Apple to bring computers into the classroom in the late 80s and 90s. While the tech has changed, his advocacy hasn’t. When there wasn’t much of a budget, he pulled some strings and got us in.
 This was my first encounter with an Ed Tech community beyond my own school walls. My twitter interactions were focused around personal interests and photos of food and cute goats (sorry cat people, hard pass). I discovered a vibrant ecosystem of teachers from all walks of life, from public Kindergarten to Carter Middle School. I even encountered a few other Catholic school teachers. There was electricity in the air. People were busy connecting and chatting, often for the first time face-to-face. They all seemed to know each other. There was some balled-guy and a Rabbi looking man that lots of people seemed to know and talk with—come to find out they were Matt “Ditch That Textbook” Miller and “The Tech Rabbi,” Michael Cohen. There were a lot of creative ideas on instruction, integration of Google in the classroom, and all sorts of inspirational things. It was without a doubt, drinking from a firehose.
Since then, I have connected with many of these teachers and practitioners on twitter and their blogs. I created an RSS feed of many Ed Tech influences via Feedly (a great RSS aggregator) and Unread (a clean and easy-to-read RSS reader for iOS). I marvel at how easy it is to connect and learn today. Personally, I am always looking for practical tips, strategies, teaching ideas, and tech integration. I find a lot of that on Twitter. Fellow teachers are providing creative ideas, workshops, Google tools, and all sorts of Ed Tech and Pedagogy resources. While I don’t have much to share yet, I love that I can take from one teacher, adapt or remix it, and share a repurposed version of it to another audience of teachers. Indeed, many of the teachers at my local school site look to me for inspiration. In turn, I find it from other teachers. Sharing our thoughts, strategies, and resources makes for a more speedy and robust transformation of education.
So, I, in turn, share some resources I have found helpful.
Here are a few helpful places to start in on the conversation with other Ed Tech practitioners. In particular, this list of top education RSS feeds and this top 10 education tech blogs are quite helpful. While I’m sure these aren’t comprehensive, the amount of experience, knowledge, and resources being freely shared online is incredible.
It might also be helpful to follow some of the top education hashtags on Twitter. They are as follows, but be sure to check out the full explanation of each Teach Thought.
#edchat #cpchat
#edtech #ntchat
#education #mlearning
#lrnchat #elearning
#edapp #engchat
#classroom #sschat
#teaching #mathchat
#playoutdoors #scichat
#edreform #artsed
#globaled #stem
Are there any hashtags or influencers that should be added to the list? Let us know in a comment below!
EdTech PLN Popplet
Posted on Jul 19, 2018 Leave a Comment
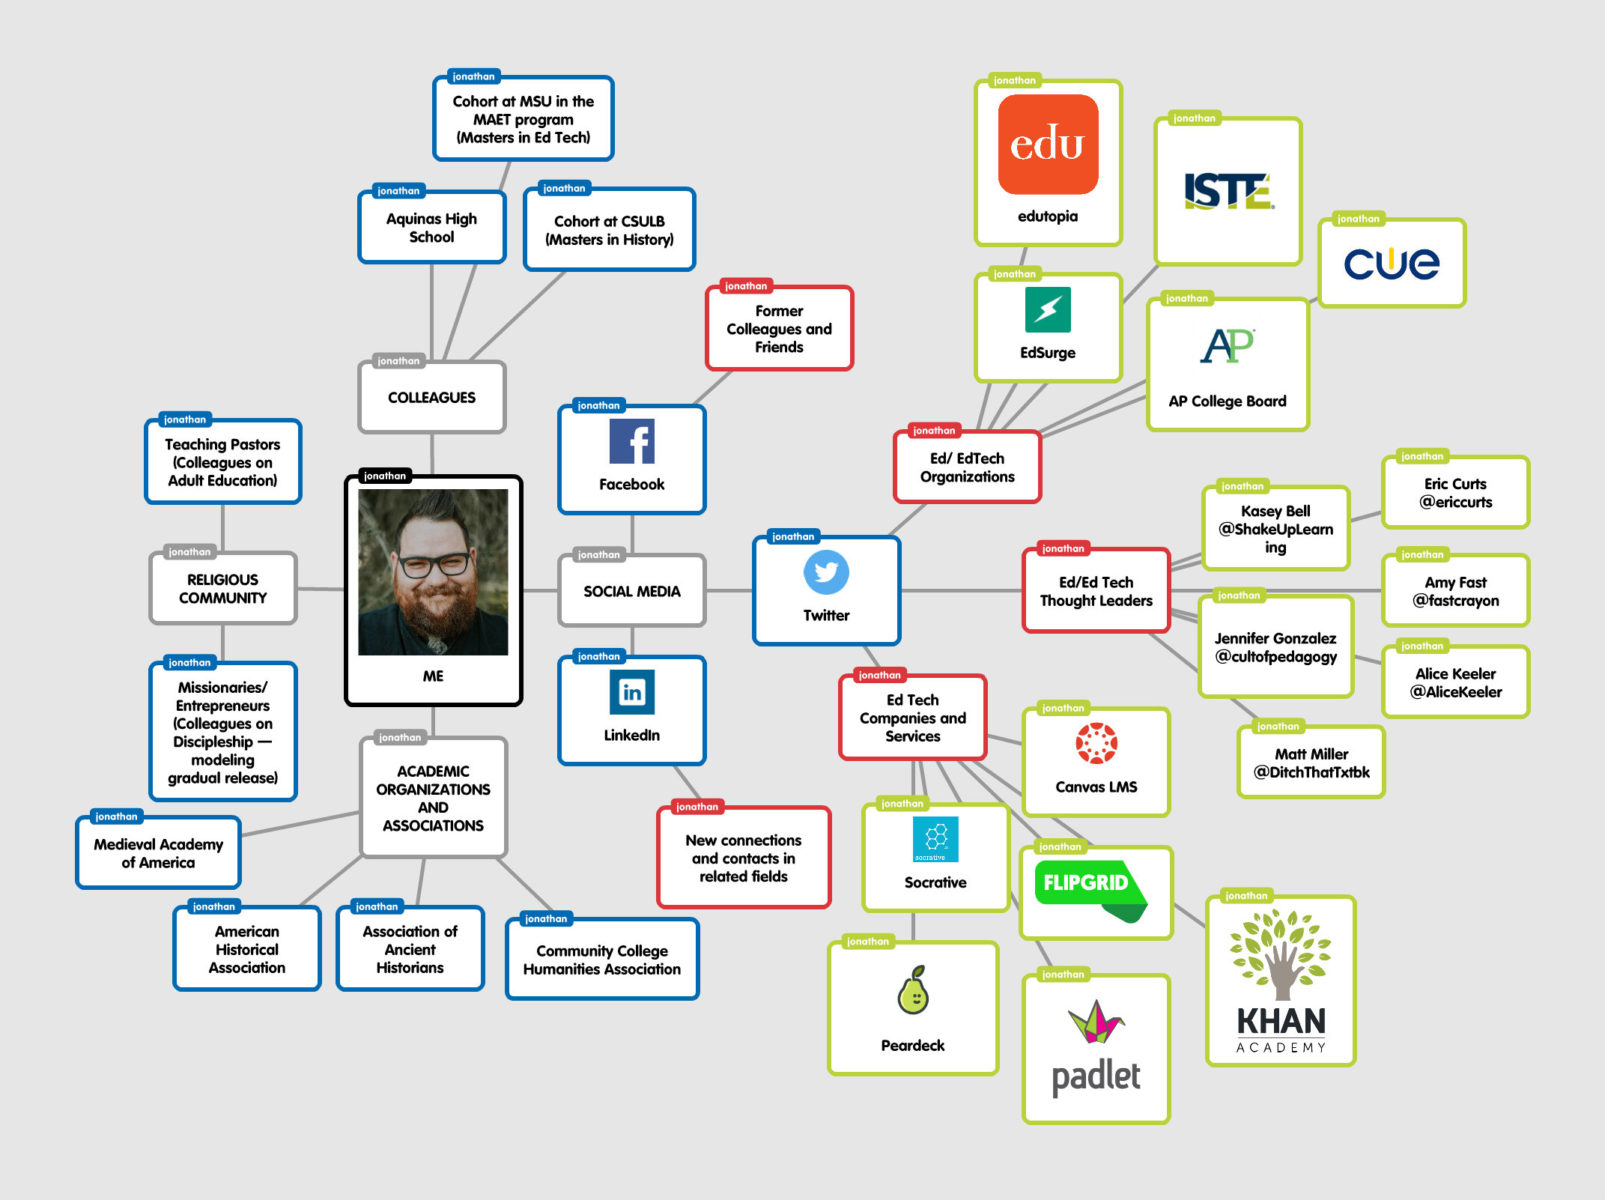
 PLNs—Professional (Personal) Learning Networks catalyze broader development, education, and growth in all aspects of society. Whether personal or professional, developing a set of thoughts and skills in a community allows for more faster developments and breakthroughs in research, growth, and practice.
Before the digital age, people would either learn in isolation—recreating the wheel as it were. Or they would be part of a physical community that mastered a particular set of skills and knowledge that would be developed through apprenticeship.
Now that we are in the age of internet adolescence, those physical barriers have broken down. People need no longer be physically in the space of those from whom teach and influence. The digital age means both a breakdown of physical and temporal barriers. I now can be fundamentally transformed in my practice as a professional by the knowledge of a person across the world from five years earlier.
Developing a PLN is fundamental to development and growth in today’s educational and professional environment. And while in the past this network might be confined to physical books or those in physical proximity, the advents of social media, in particular, has changed everything. The sharing of pedagogy, teaching resources, webinars, micro-credentials, and all other sorts of professional development are shared widely through social media.
The Popplet Mind Map below is a brief reflection of the power of creating a PLN. The connectivity to diverse research and ideas that would otherwise be absent in an age before is astounding. This visualization, like an iceberg, only touches the surface of professional possibilities.
 Loading...
Mind Mapping is a critical thinking skill, both academically and professionally. Both for teachers and students, mapping your thoughts and practices out through a tool like Popplet can be a compelling visualization of one’s thoughts.
TRANSFORMING THAT DUSTY OLD MAP: CHIBITRONICS, PAPER CIRCUITS, AND INTERACTIVE MAPS
Posted on Jul 15, 2018 Leave a Comment

At Aquinas High School (the school at which I teach) has a saying: “turning today’s students into tomorrow’s leaders.” Yet I wonder, what world are our students stepping into? It seems like something out of a sci-fi flick, but this year’s freshman will graduate High School in 2022. Of that group, the four-year college-student will graduate in 2026 and will likely head out into the job market or graduate school just before the 2030s. By this time, massive space, robotic, and bio-mechanical breakthroughs are going to transform not only the job market but the economy. According to a spokesman from Dell Technologies, “An estimated 85 percent of jobs in 2030 haven’t been invented yet. The pace of change will be so rapid that people will learn ‘in-the-moment’ using new technologies such as augmented reality and virtual reality. The ability to gain new knowledge will be more valuable than the knowledge itself [emphasis added].” (PR News Wire) Since the new information that will be vital to student success in college and career is likely not invented yet, let alone taught, it behooves the educators of today to prepare our students how to think, problem solves, tinker, imagine, repurpose, and be creative. We can teach skills and ways of thinking that will prepare them for being able to quickly adapt and gain that new technological knowledge as it emerges.
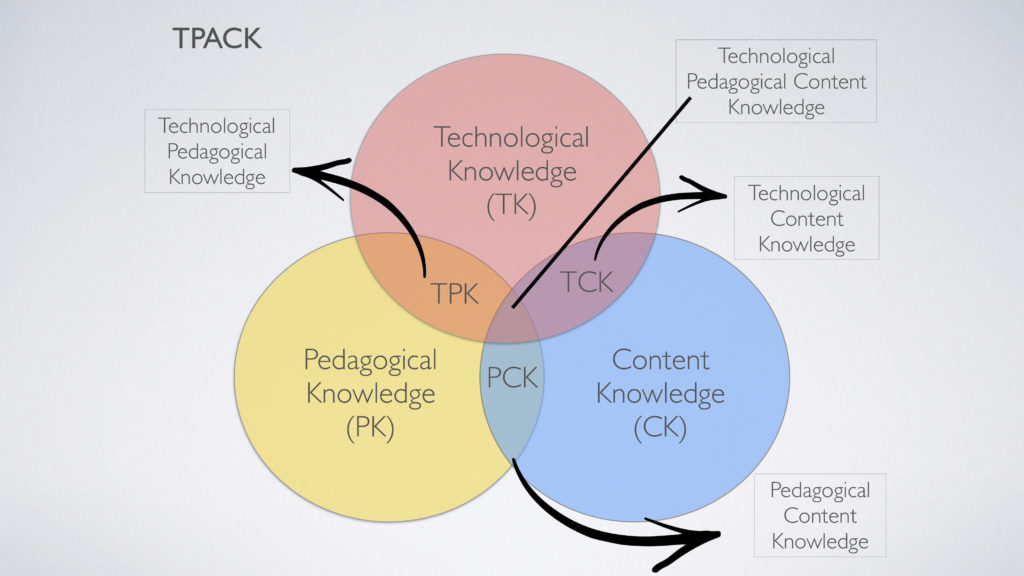
Indeed, Punta Mishra argues that technology is changing so rapidly that we should not focus our attention on specific pieces of tech to guide our education. Instead, we should concentrate on good pedagogical practices and content knowledge that uses technology effectively. “The TPACK framework emphasizes the importance of teacher creativity in repurposing technology and tools [to] make them fit pedagogical and disciplinary-learning goals” (Mishra, 2012, p. 14). TPACK—the intersection of Technology, Pedagogy, and Content Knowledge—is the golden zone of education where the most effective instruction can be provided to our students.
Our students need creative solutions to approaching our content—especially in the Social Sciences. Often these courses either have incredibly creative teachers or teachers who stick to the “Sage on a Stage” method—lecture, notes, knowledge assessment, repeat. I fear the latter may be more common. New and creative approaches need to be developed and tested. In light of this, I want to explore technology integration in creative assignments geared for the High School Social Science and Middle School classroom.
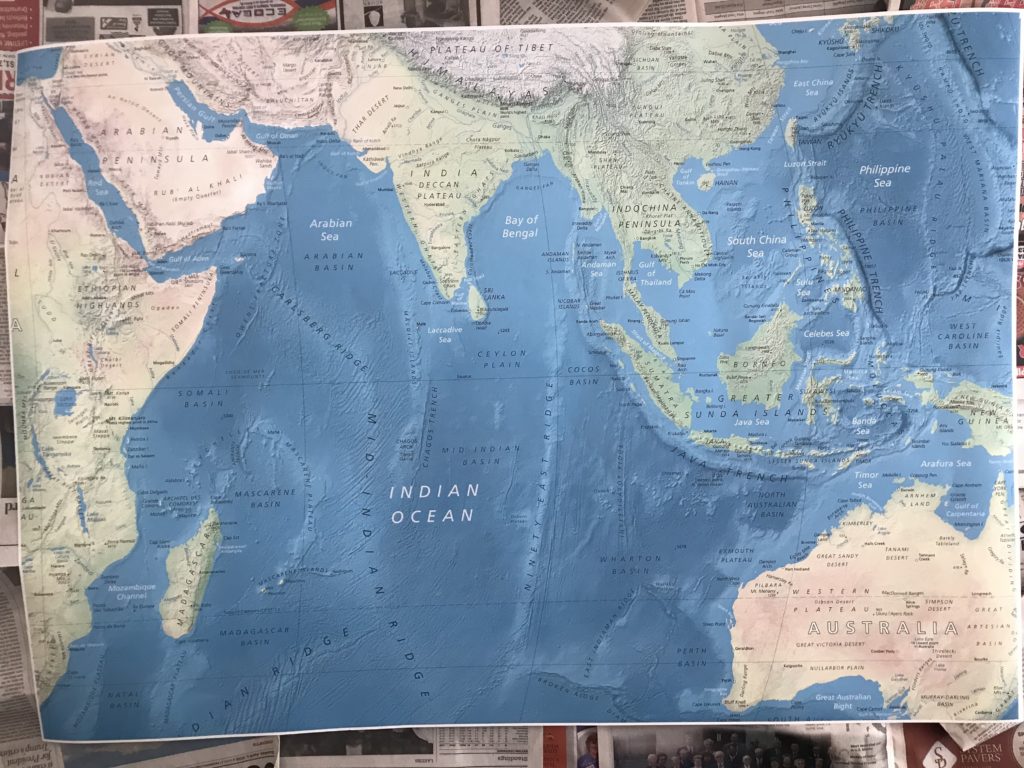
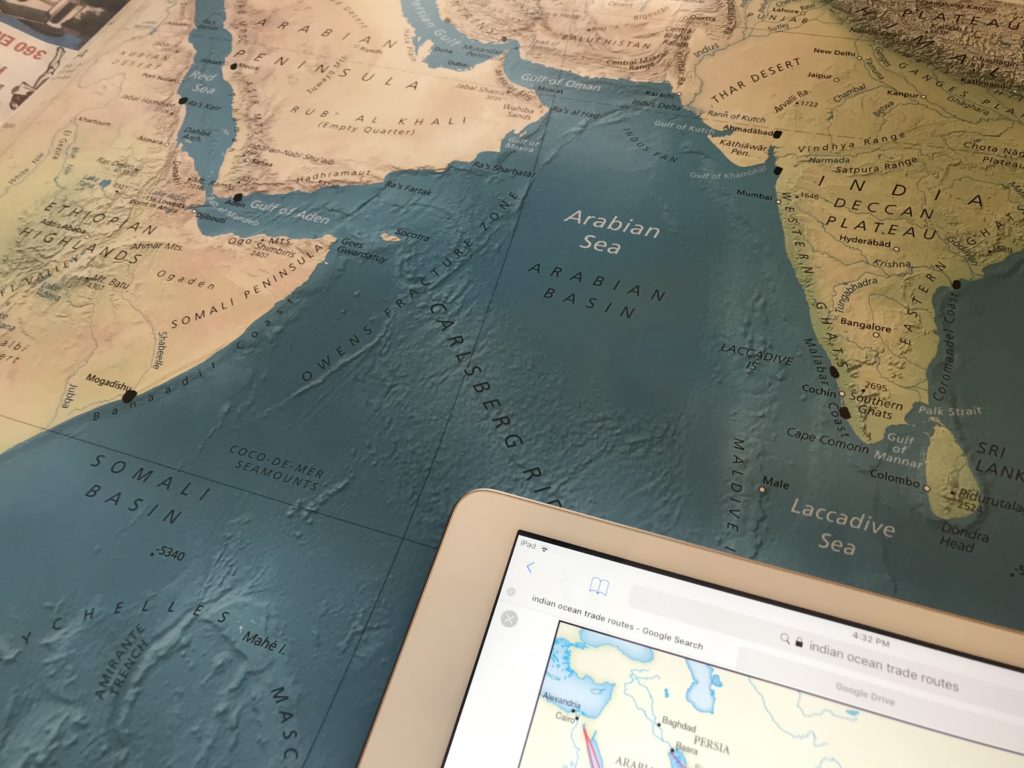
To this end, I decided to explore a fun activity with Chibitronics paper circuits and an old map of the Indian Ocean that I had on my classroom wall. I wanted to create an interactive map where a student could research trade routes from a particular era and build a circuit system that lights up trade hubs when a button is pushed.
This project is in beta, as they say. I imagine it will take students 120 minutes or so, a block period or a couple of days in the classroom should be enough. I imagine this would work well with small teams, perhaps working on different trade routes like the Silk Road, Saharan Trade Routes, Atlantic Trade System, or early Pacific Island exploration and trade.
Materials needed:
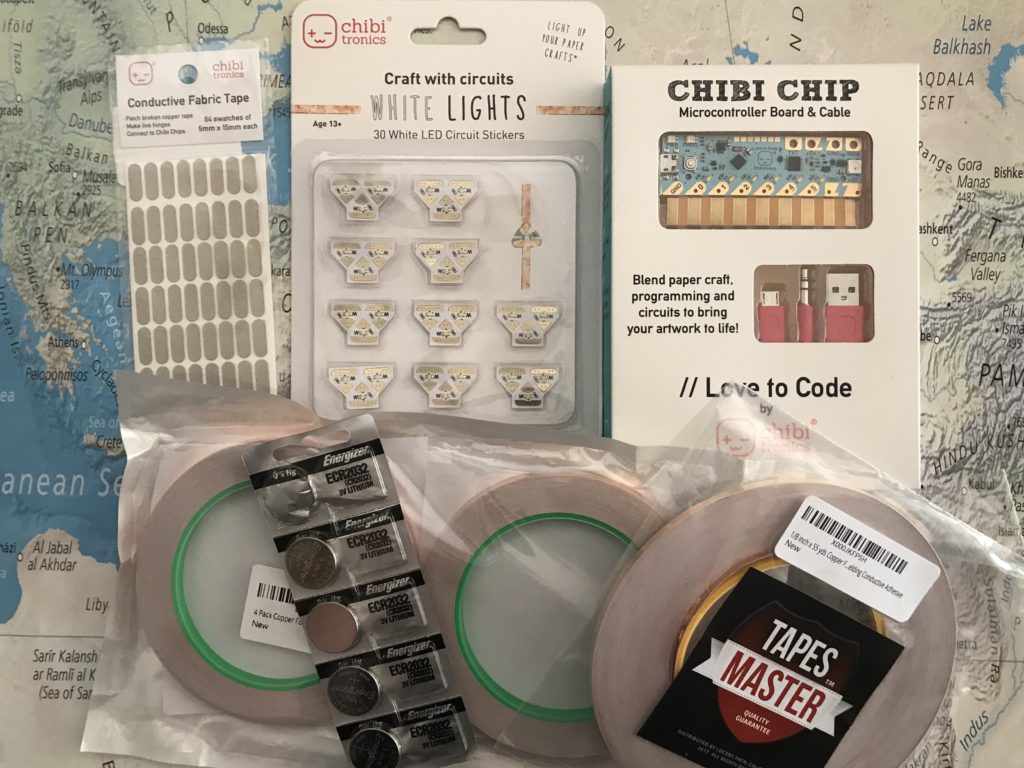
The 30 White LED Circuit Stickers, (link)
4 pack copper foil tape with Conductive adhesive, (link)
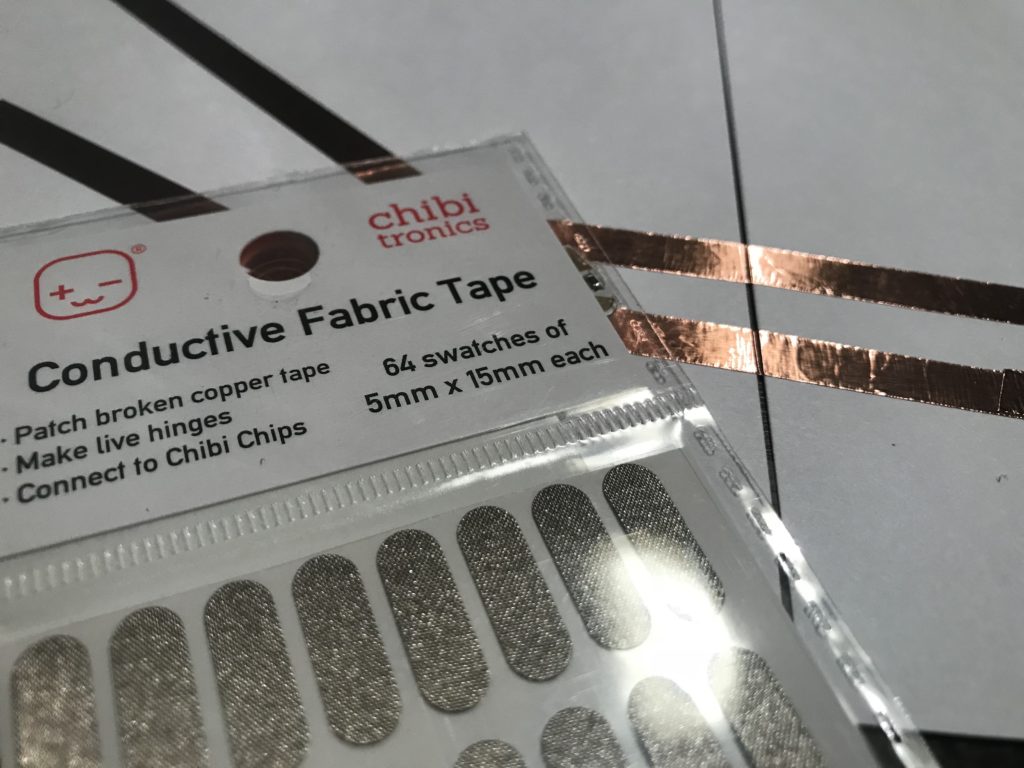
Conductive fabric tape (for patchwork and make hinges for stronger holds in weak areas) (link)
Sharpy
X-Acto or Utility knife
Cardstock paper
Tape
Flat Battery
How To: Step-by-Step:
Step 1: Find an old map that you don’t mind cutting into
Step 2: Find a helpful and reliable map of the trade networks online
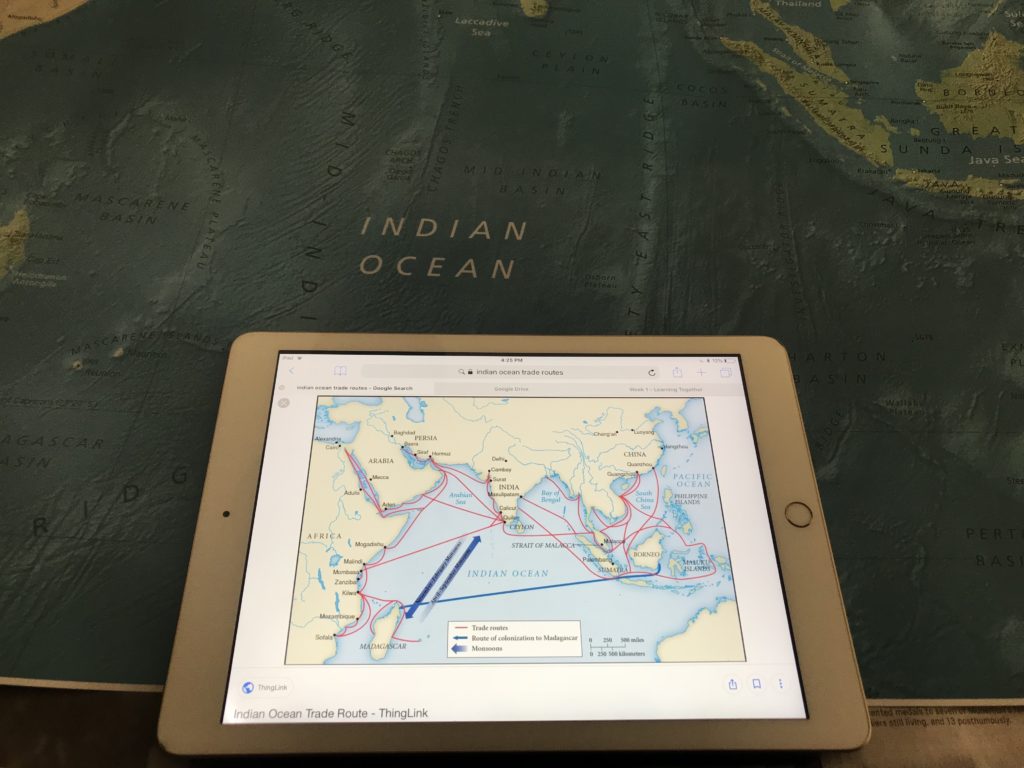
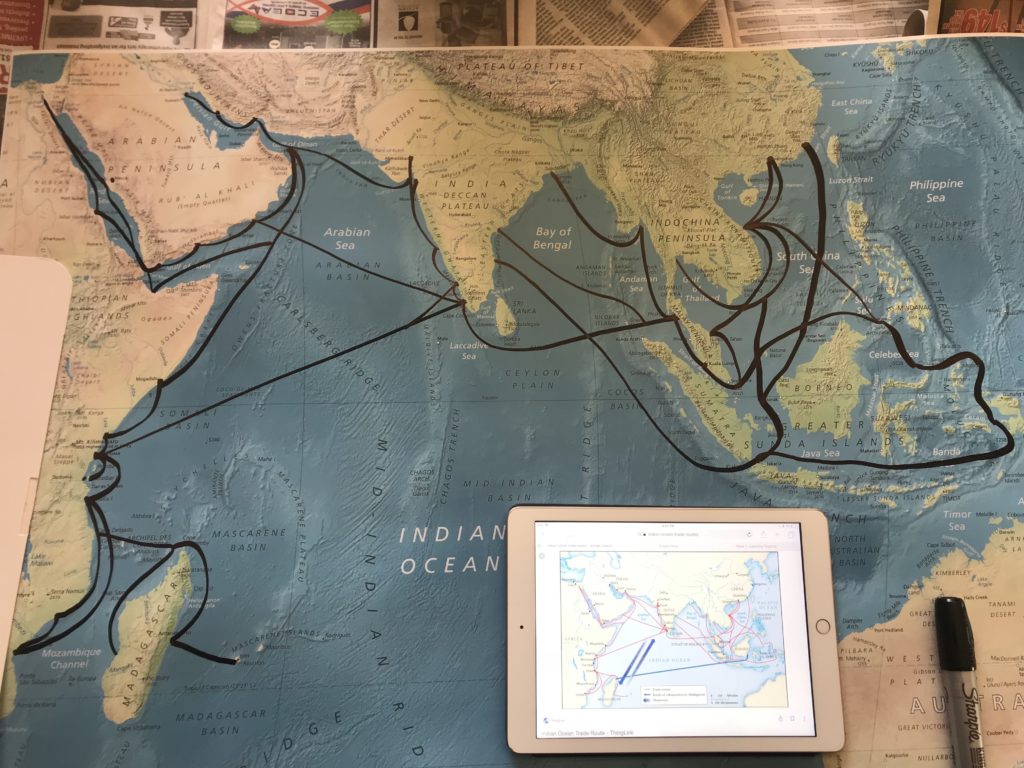
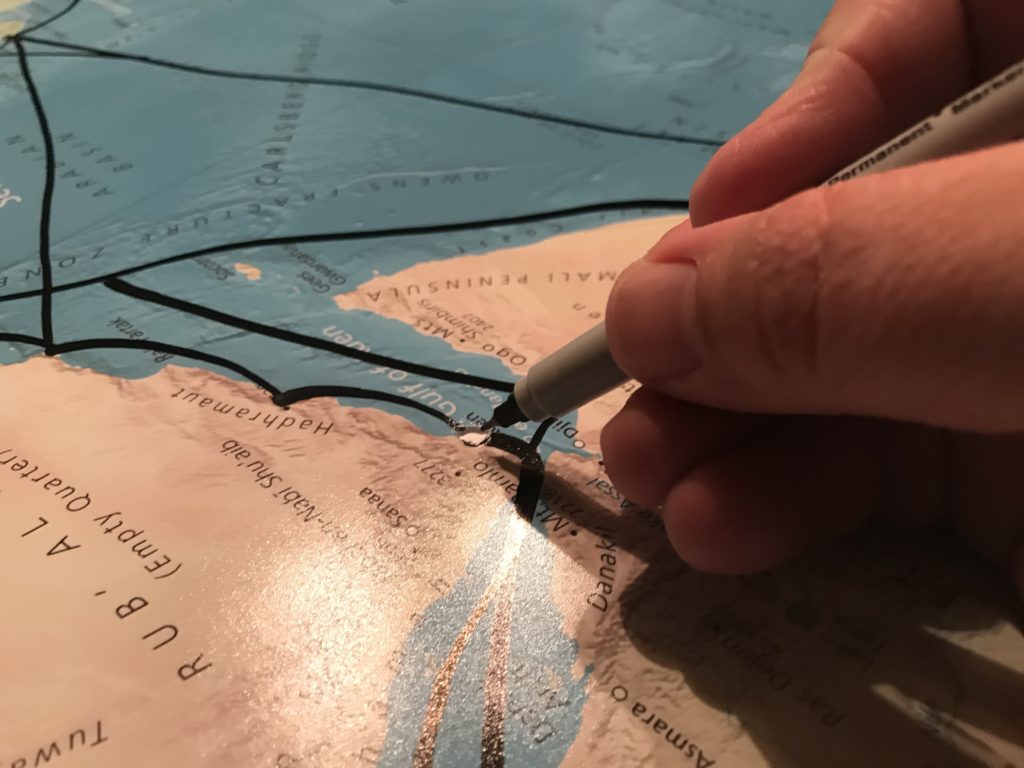
Step 3: Using the map online, mark all the trade ports—making particular note of large trade cities. You can use any marker, but I found that the Sharpie King Size Professional works best. This marker has different angles on the tip but is large enough to handle a large map. The size needed will depend on the map you are using. *Pro tip: to avoid marker bleed-through, lay down some newspaper—just in case.
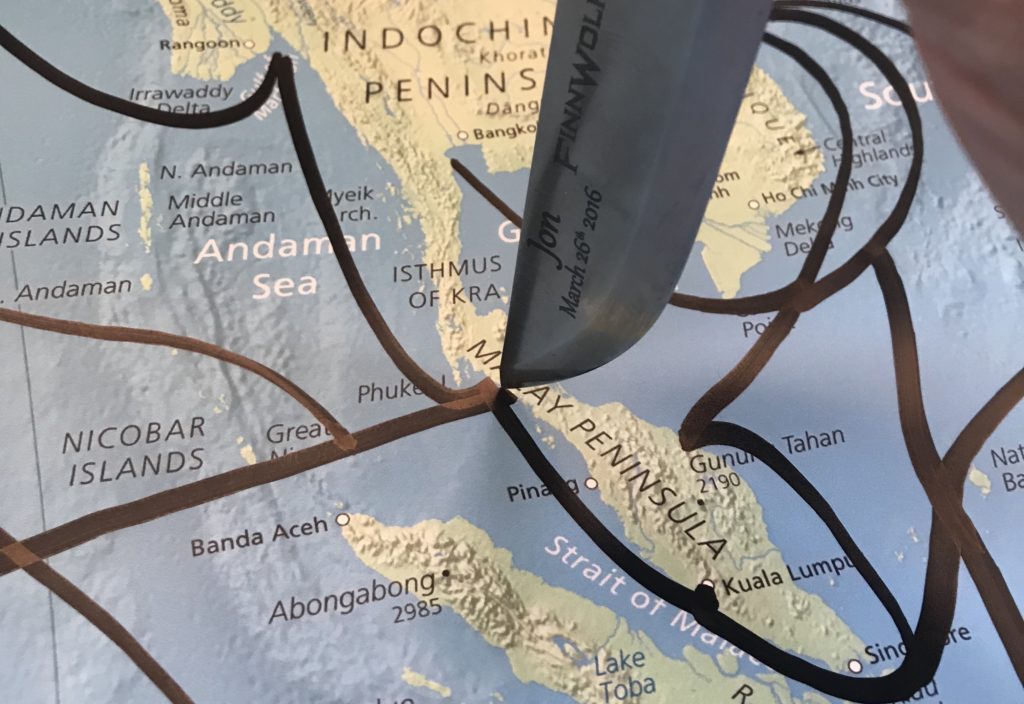
Step 4: Carefully connect the dots in the manner already illustrated on the map. This is harder than it looks, but it is actually a rather insightful process because one begins to wonder why ships took particular routes or why they went around specific islands and not others.
Step 5: Use a knife, preferably an X-Acto or utility knife (I learned the hard way) to cut some holes in the major ports. I only did nine of the major ports, but there are many, and depending on time and materials, you could have them do less or more. It is through these holes that the LED lights will shine through, so precision in cutting and removing excess material is best.
Step 6: Flip the map over and lay down card stock paper—the thicker the better—over the holes in such a way that the papers overlap and can be taped together. After they are taped together, tape the paper to the actual map so that when you flip the map over, it won’t move out of place. *Pro tip: Don’t overdo the tape to prevent damage to the map.
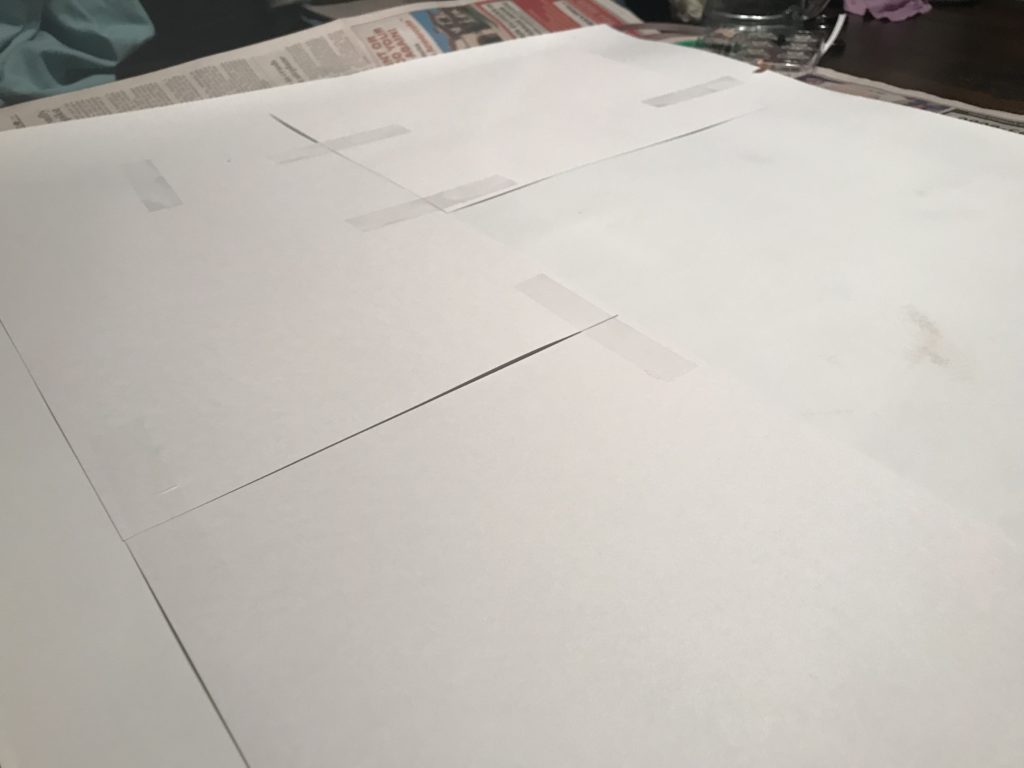
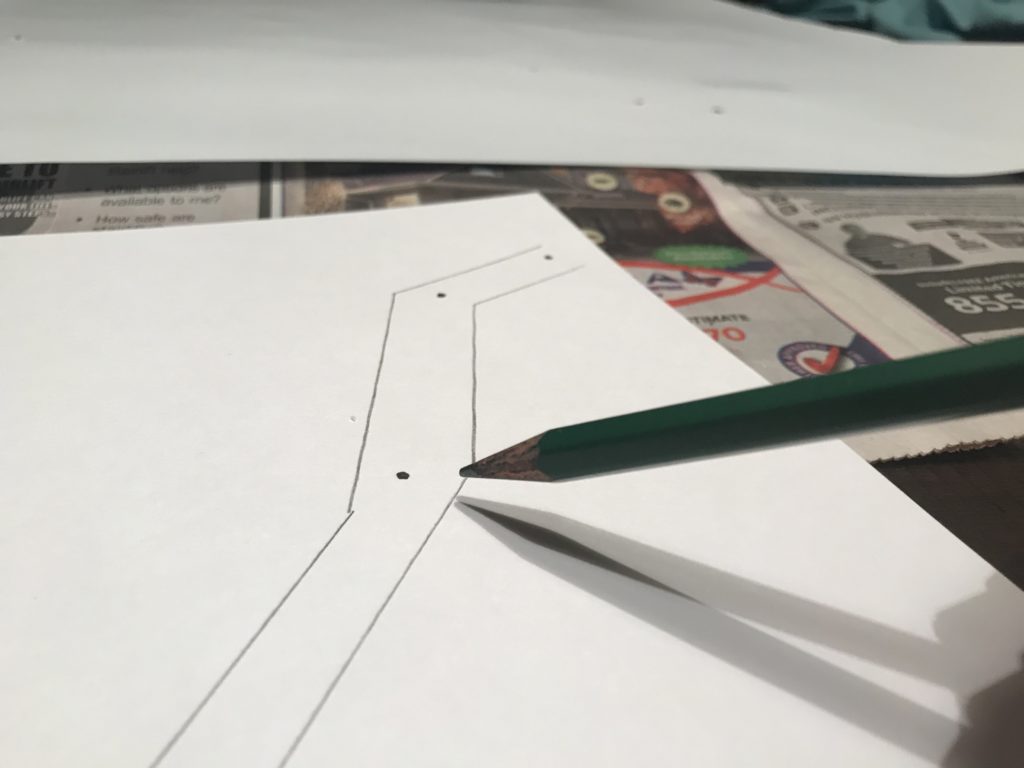
Step 7: Flip the map over again and use a smaller sharpie to make a dot through the hole in the map onto the paper that is taped to the back.
Step 8: Flip the map over again and gently cut the paper free from the map. Be sure to leave the papers themselves taped to each other. This will make it easier to work during the proceeding steps. Only remove it from the back of the map itself. *Pro tip: mark the orientation on the back of the paper relative to the map itself. When we try to put it back, it will help to know which is the top and which is the bottom. We are only going to see copper tape and lights for a while so this orientation will be helpful in the end.
Step 9: After removing the papers taped together, draw out a path that the copper tape will follow with a pencil. No one will ever see this part, so feel free to make mistakes or redraw what doesn’t seem to work.
Step 10: Lay down your first row of copper tape. Make sure that your copper tape is conductive on both the top and the adhesive side. If the copper is not conducive on the adhesive side, you will have weak and unreliable connections each time you overlap the copper tape. *Pro Tip: It is helpful to mark which side of the two lines of tape will be negative or positive. Make sure that the gap between the two lines of copper is not so far apart. The negative and positive sides of the LED Stickers need to make contact with each side of the copper.
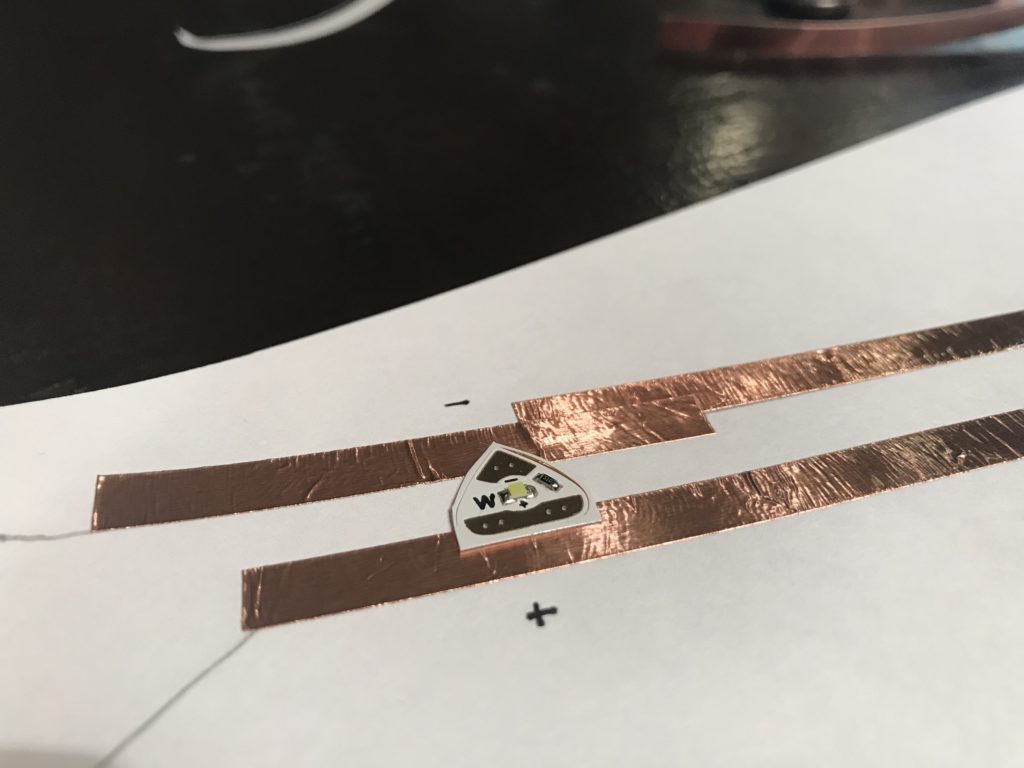
Step 11: Make sure both copper lines spread apart at the edge of the paper where you will have the battery attached. Make sure you use a flat battery. The specific sort is not essential. The one I used is a 3V Lithium 2032. The important point is that the top of the battery is a positive charge and the bottom is a negative. Make sure that the orientation of the battery aligns with the desired positive and negative copper lines, which in turn determines the direction of the LED sticker lights. Make sure the positive is on the positive and the same for the negative. Make sure that the when the paper corner is folded over, the positive is touching the top and the negative is touching the bottom. *Pro Tip: if you are using double adhesive copper tape, make a double-sided tape loop to secure the battery to the bottom copper line. That way, when the top paper corner is pushed down onto the battery, the circuit is completed and will turn on the lights. This can be turned into a button of sorts later.
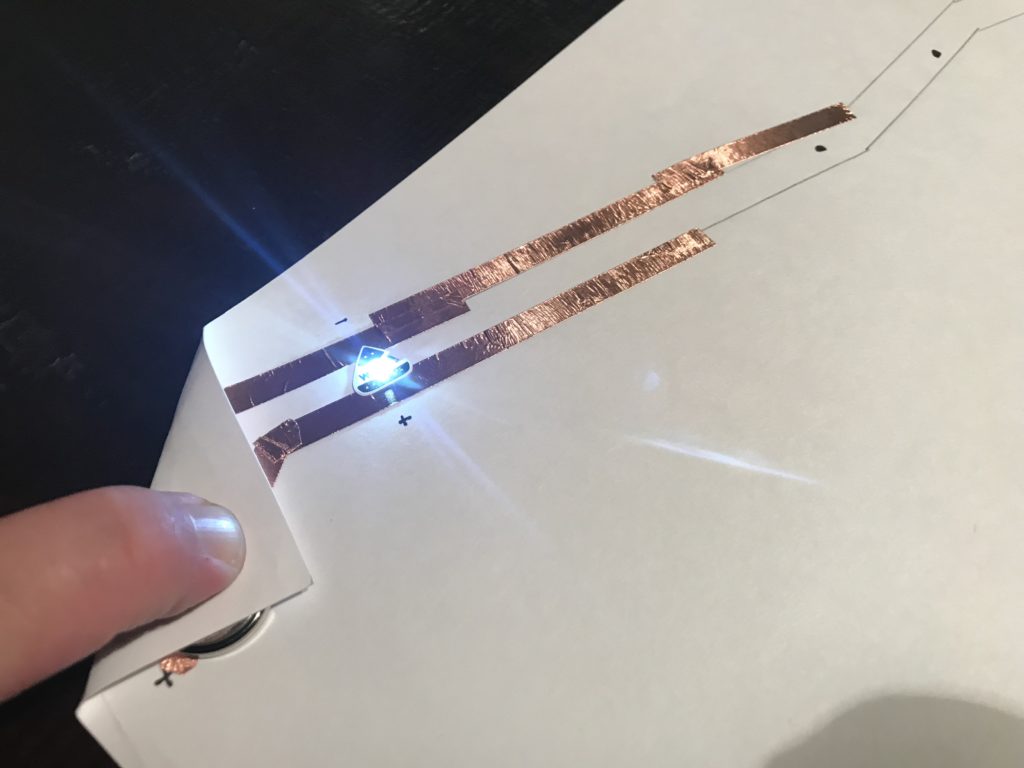
Step 12: As you build each line, lay down an LED and test for connectivity. This is important because if there is a weak connection, the light will not turn on. When an LED does not turn on, remove the sticker (this will likely damage the sticker beyond repair—I know, I messed-up several times myself) and lay some new copper tape and reconnect the light. Sometimes it requires a little fiddling and finesse to get a finicky connection to be less so.
 Step 13: After the desired lines are created, and the LED lights are in place, be sure to test the entire line. It is critical that the power connection is secure and works well. Otherwise, flickering lights and a poor connection will persist.
Step 14 (Optional): If you used more than one paper across which copper tape cross, use the Conductive Fabric Tape from Chibitronics to make more secure conductive hinges. If the thin copper breaks between these pieces of paper, the proceeding LED lights will not turn on.
Step 15: This is a tricky one, but it is the final step! Align the LED lights on the back of the map such that the light will shine through the previously made holes. When this is secure, you will have completed this rudimentary interactive map!
Possible expansion and application in the classroom:
Again, this project might be expanded into team map projects where different groups of students are working on various trade routes.
It might also be interesting to figure out how to illuminate an entire route rather than just the ports themselves. There might be multiple buttons that illuminate different parts of the trade routes. This would require some other system of lights, but it is an intriguing idea.
This assignment might serve well in a middle or high school classroom, though the trade routes themselves would likely be in the 6th grade Social Science curriculum. How else might this interactive map be applied?
Let me know what you think or how this might be applied in different contexts.
OPERATION PHOTOSHOP: PART 1
Posted on Jul 14, 2018 Leave a Comment

I am a creative by nature. I love well-designed art in all forms. And I especially love when quality and care is crafted into the classroom content. Perhaps the students don’t care if the teacher uses clip art on their handout or powerpoint, but I do. I love media-rich presentations created with care and attention to detail. I can design a speech, and I can develop a lesson, but I struggle with quality media.
I often turn to colleagues to create designs or background cutouts from images. While there are numerous applications and different kinds of software, the primary standard for graphic design is Adobe Photoshop. Indeed, the application software has trickled into our language just as “google” has. If you don’t know something, “google” it. If something looks off (or too perfect), they “photoshopped” it.

Just last year I had a friend create a picture of “thinking-man thinking about a thinking-man” for the cover of my Philosophy syllabus. I want this same skill to edit and create images, logos, and designed text in Photoshop. I believe command of this design software will translate into better work and more marketable skills.
To that end, I have decided to undertake a project of learning Adobe Photoshop through the use of only Youtube videos and discussion forums. There is a vibrant community of graphic artist in both of these social network spaces on the Internet. There are many posting “how to” videos for beginners all the way through advanced skills and practices. I will spend the next four weeks watching the following Graphic Artists’ youtube channels: Alec Markarian, Photoshop Tutorials, Spoon Graphics, PiXimperfect, and Flow Graphics, among others.
Adobe is now offering exciting options and bundles of apps at affordable prices on monthly payment plans. This has made many of their programs accessible to a whole new community. As of this post, I have successfully purchased, downloaded, and installed the software. My next steps will be watching more videos and walking-through editing and creating images. I plan on learning how to remove the backgrounds of several photos first. I then plan on learning how to create a few logos and graphics.
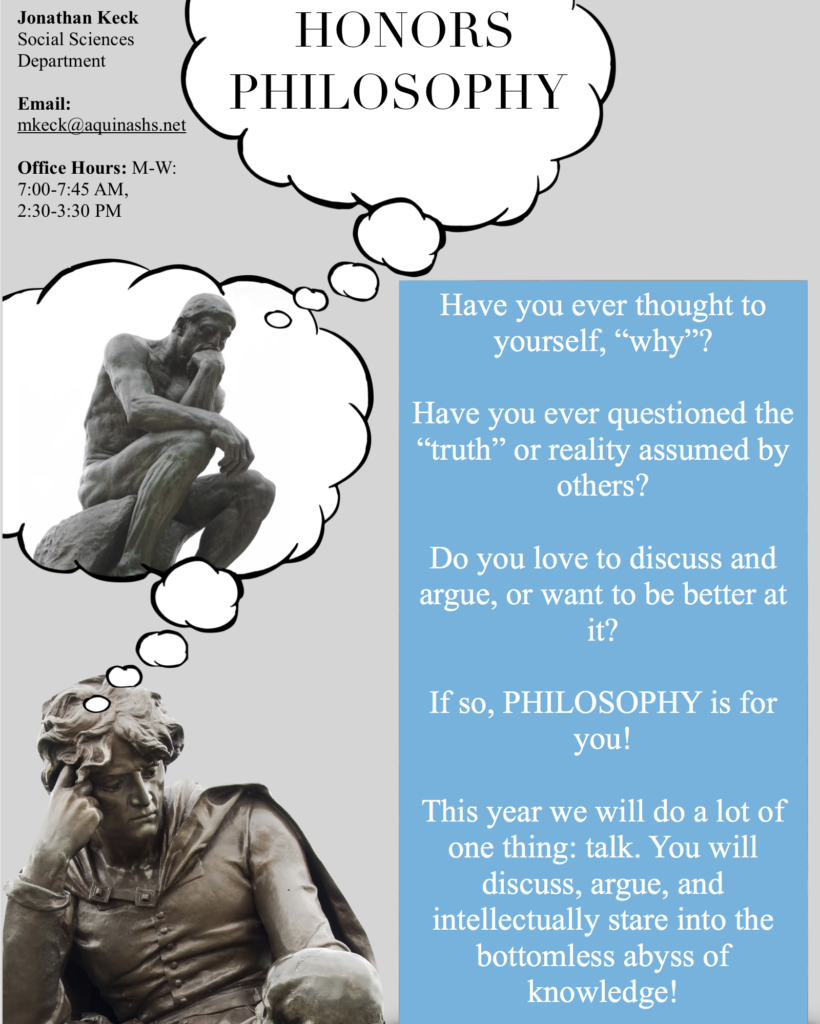
The Philosophy syllabus cover page with graphics that I would like to learn how to duplicate and improve upon.
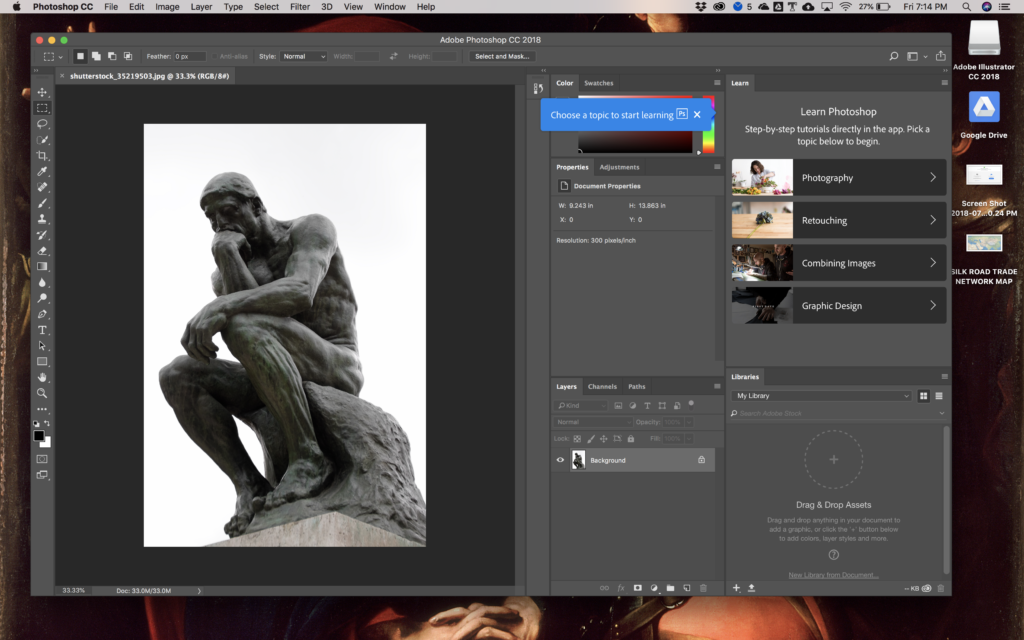
The Photoshop software with which I am just starting to play and learn.
Creating a Culture of Lasting Learning
Posted on Jul 8, 2018 Leave a Comment
 Once again, Simon earned a perfect score on his weekly quiz. While other students struggled, this student thrived on the vocabulary and grammar chart quizzes. He outperformed most of his peers and had a perfect 100% in his quiz grade category. The trouble was that Simon was failing every test and most homework assignments. He had an uncanny ability to memorize raw information and had been a straight-A honors student throughout elementary and middle school. His parents were understandably frustrated as they sat in front of me in a teacher-parent meeting. Simon was in both my Honors Latin I and AP Human Geography courses. In both classes, he struggled through applying his raw knowledge to the larger themes of the course. He especially struggled to apply information to new scenarios within the course. Simon may have thrived in memorization, but he seemingly had little deep learning over the years. I was a new teacher and did not know how to help him, both to my own and his parents’ frustration.
Though I’ve changed the name of the student, this anecdote is true. And it has also stuck with me over the years. How to do I reach students and encourage them in deep, real, lasting learning? I believe that a blend of better pedagogical practices along with well-utilized technology can create a classroom culture of lasting learning.
I explore this topic in further depth in a paper entitled “Creating a Culture of Lasting Learning.” It is a response and a series of musings on how I as a teacher might implement better pedagogical practices to encourage deep and lasting learning in my students. Please click on the title of the work for a google doc of the paper.
I appreciate your thoughts and feedback!
Incidentally, I reference two video projects from former students in the paper. I have included them here for reference.
VALE!!!!
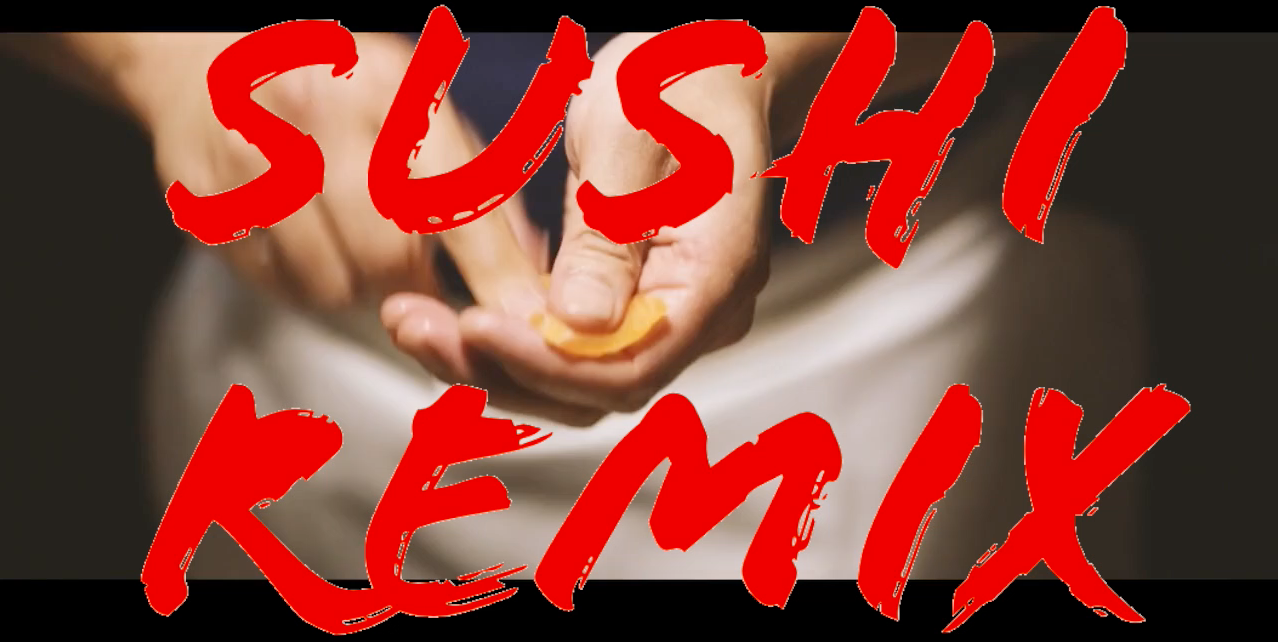
SUSHI REMIX
Posted on Jul 8, 2018 Leave a Comment
Context and Theory
All cultures emerge from influence, mixing, and remixing. Food culture is rife with examples of regional influences and transformations. Indeed, like all human activity, people have a desire to make good food—not only for themselves but for those around them. If there ever were a more consistent type of “making culture,” it would be food. Every culture uses both their traditions and resources to create a unique cuisine. However, resources change, and people migrate. There are many examples of how food has evolved and changed as a result of influence and transformation through “remixing.”
Sushi is a good example.
Like most food cultures, sushi, as we know it, has transformed through influences, demand, and responses to a crisis. Concerning the latter, sushi chefs began serving ground wasabi with raw fish during the Edo period. While the science was likely unknown, the root contains anti-microbial properties that reduced the risk of food poisoning. This practice was likely a response to movement of fish into the interior of Japan as demand for sushi increased. However, no doubt people developed a taste for it. Due to cost, most sushi restaurants do not serve real wasabi today, but rather a type of processed horseradish.
Remixing is adapting and innovating.
Moreover, much like sushi, education and teaching require the same process. Whether concerning technology or pedagogy, Good teaching “remixes” in response to not only inspiration but also need. By modeling new approaches to the curriculum, students will be inspired to embrace their own making and remixing.
This video is an example of how students might research a particular topic of their choice, find videos and images, and piece them together in a project.
How I did it.
After some research on the history of sushi, I visited both Vimeo and Prelinger Archives for film clips. After writing a script, I recorded the audio using a Blue Yeti USB Microphone and GarageBand. I then added the various clips and my audio to iMovie to edit the video and audio together. I removed the sound from the original clips, but saved the music from one of the clips as background music. I created the “Sushi Remix” text on a white background using Adobe Spark and used Lunapic to make that image have a transparent background. I then uploaded the image to my project and overlay it over some video.
What’s important to note here is that while I have used a few of these technologies here-and-there, I have never undertaken a large task like this before. Students would likely have the same experience that I had.
Portions of the video came from the following locations:
“My Japan” from the U.S. Treasury Department, c. 1945 — Public Domain
“The Fighting Tuna” — Public Domain Mark 1.0
“Authentic Japanese Sushi Experience” from Kim Laquindanum and Daniel Apolto — Attribution 3.0 Unported (CC BY 3.0)
“Sushi Confidential Commercial” — Public Domain
“Sushi Tei 6th Anniversary // ‘a day in sushi tei’ by MYEL STUDIOS CINEMA — Attribution 3.0 Unported (CC BY 3.0)
“Coffee Pot” by Headshot Studio — Attribution 3.0 Unported (CC BY 3.0)
Music selection comes from “Authentic Japanese Sushi Experience” which originally derives from Andrew Applepie (Secrets, Wish You)
